|
FIrst, it is good to familiarize
yourself with the plugs, wires, sensors and computers of
the ECI system and the dash. Once you are
familiarized you should figure out what method is best
for what you want to do. Depending on your
personality and style there are several ways to do this.
If you don't like making these big decisions shoot me an
IM and I'll see how I can help. Also, DSMs and
sometimes Starion's can vary from year to year.
You probably know that 1Gs are very different than
2Gs... but 90's are different from 1Gs too.
Double check all the information with testing and a
circuit diagram.
|
|
There are only 2 plugs that you need to worry about on
the Starion: B-38 and B-22. B-38 is where
you get your power and how you get signal to your
gauges. B-22 one of 2 plugs going to the gauge
cluster. You will need to tap into the chassis
side of this plug to supply the tachometer signal.
See the Diagram for the
correct pin to tap. |

Click for B38's pinout. |
|
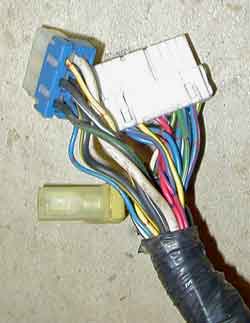 |
The DSM harness on the other hand what
was conveniently in one plug on the Starion, spread out
over 3 plugs. Click
for pinouts for these plugs. |
|
The next thing you will need to fiddle with is the ECI
control relay. These plugs and the relay are all
you need to tap into. Everything else is left
alone. |
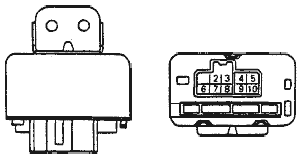
Click here for the relay and
ECU pinouts. |
|
'90 DSM
to '88 Starion Wiring Diagram |
Time to get out the soldering iron.
This diagram will show you which wires need to connect
to each other. All your warning lights and gauges
will keep working too! |
|
|
|
Much to my surprise the Starion tach
works with the '90 setup. In theory it shouldn't
have worked going from a single coil to dual coils.
Maybe I didn't understand the FSM or something.
Either way I hooked it up to see if it would work and it
works great! It is pretty insane to look down and
see the needle BURIED at 7300RPM on the stock 6000RPM
redline tach and knowing you still have 200RPM to go!
Just imagine if I built a destroker motor that reved to
12,000rpm!
|